Learning Center
Find all the training you need in one place. Become an expert in a few minutes.
- Top Features
- Guides
- FAQs

Manage Applications
Manage all your net metering applications in one place. Search, view, edit and submit applications easily.

Get Pre-Approved!
Help your customers select the right system size and get it pre-approved prior to installation.

Invite to Sign Agreement
Invite your customer to sign the Interconnection Agreement electronically and then get notified by email once it’s completed.
Track Application Status
Stay on top of the application's progress. Track its status, view details and take action.


Get Email Notifications
Receive emails to keep you informed about the application’s status.

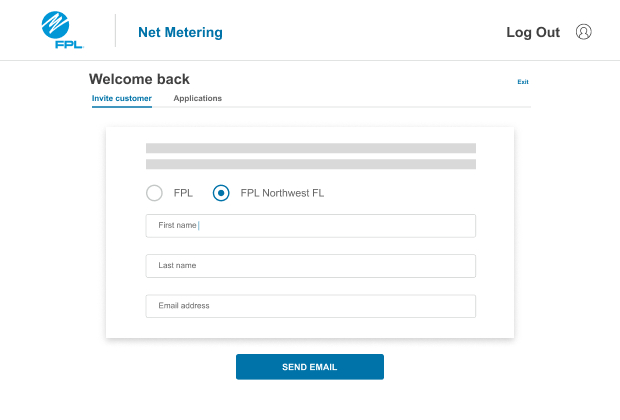
Invite to Start Application
Provide your customer's email address and FPL will send them an invite to start a new net metering application.
- FPL
- NW
In this section you'll learn how to:
1.1 Register for an account
1.2 Login
1.3 Enroll Your Business
1.4 View Business Verification Status
1.1 Register for an account
- Click "Log In" from the menu bar.
- Click "Register" from the "Welcome to Net Metering Portal" page.
- Once on the “Register” page, complete the form with the email, password, name and phone number.
- Once you’ve completed the form, click “Finish Registration” on the bottom.
- You will receive a registration confirmation email.

1.2 Log In
- Click "Log In" from the menu bar.
- Enter your email address and password
- Click "Log In" at the bottom.

1.3 Enroll Your Business
- After logging in, view the "Enroll Your Business" page.
- Update the business name, license type, license number and address.
- At the bottom, click "Submit". Note: Only one log in ID per business is available.

1.4 View Business Verification Status
- An FPL representative will verify the business and license information.
- If pending verification, you should be able to view the "Business Verification Pending" page.
- If verification failed, you should be able to view the "Business Verification Failed" page along with the reason of failure. You can update the business information by clicking "Retry".
- If successfully verified, you should be able to view the "Get Started" page. You will also receive an email.

In this section, you'll learn how to:
2.1 Send Invite To Start Application
2.2 Get Application Access Email
2.3 View Application
2.1 Send Invite To Start Application
- Click "Invite Customer" from the "Get Started" page.
- Complete the form with the details like first name, last name and email address.
- Click "Send Invite".

2.2 Get Application Access Email
- Once the customer provides you access, you will receive an email notification.
- Click "Access Application" from "Access Granted" email.

2.3 View Application
- After logging in, view the "Applications".
- Select the application for which access has been granted and start editing.

In this section, you’ll learn how to:
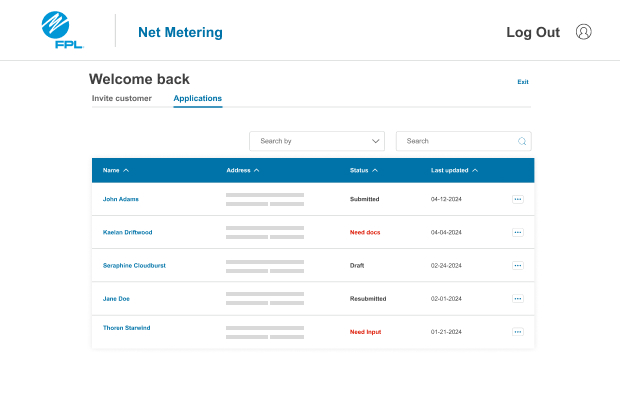
3.1 View Applications
3.2 Search Application
3.3 Track Application Status
3.1 View Applications
- Log in to the Net Metering Contractor Portal.
- Click “Applications” from the menu bar.
- View the list of applications for which your business has access.

3.2 Search Application
- In the search section, select “Search by” option such as Name or Address.
- Enter keyword or select from the dropdown and click “Search”.
- Look through the "Search Results" and select the result you want.

3.3 Track Application Status
- Select an application from the “Application Dashboard” or “Search Results”.
- View the application details, such as Application Status, Application Form, Messages and Status History.

In this section, you’ll learn how to:
4.1 Start Editing an Application
4.2 View Customer Information (Step 1)
4.3 View Contractor Information (Step 2)
4.4 Edit System Information (Step 3)
4.5 Edit Documentation (Step 4)
4.6 Review & Submit Application (Step 5)
4.1 Start Editing an Application
- Select an application from the “Application Dashboard” or “Search Results”.
- View the application details.
- Click “Edit” button to start editing the application.
- The system will automatically redirect you to the next step to be completed in the application process.

4.2 View Customer Information (Step 1)
- You will not be able to edit the “Customer Information”. Only customers can edit this.
- View the customer address, phone number and email address.
- Click “Continue” to view the “Contractor Information”.

4.3 View Contractor Information (Step 2)
- You will not be able to edit the contractor and access information.
- View your business name and access information.
- Click “Continue” to “Add New System”.

4.4 Edit System Info (Step 3)
Add New System
- As you start typing the manufacturer and model name, suggestions will be available. Select a manufacturer and model from the search results.
- Complete the form with energy type, manufacturer model and array information.
- Click “Save & Continue” to view “Systems on your Application”.

View Systems on your Application
- View the list of systems added to the application, tier and application fee on the “Systems on your Application” page.
- You can add multiple systems by clicking “Add System”.
- Click “Save & Continue” and the system size will be validated. If the system is oversized, a popup message will show the oversize percentage. Reduce the system size accordingly.
- Once the system is properly sized, proceed to “Add New Inverter”.

Add New Inverter
- As you start typing the manufacturer and model name, suggestions will be available. Select a manufacturer and model from the search results.
- Complete the form with manufacturer, model and number of inverters.
- Click “Save & Continue” to view “Inverters on your Application”.

View Inverters on your Application
- View the list of inverters added to the application on the “Inverters on your Application” page.
- You can add multiple systems by clicking “Add Inverter”.
- Click “Save & Continue” and the inverter size will be validated. If the invereter is oversized or undersized, make the corrections.
- Once the inverter is properly sized, proceed to “Pre-approval”.

Get Pre-approved
- “You are Pre-approved” page is shown only if the system is properly sized.
- The preapproval is valid for 365 days. Note the preapproval expiration date.
- Click “Continue” to proceed to “Documentation”.

4.5 Edit Documentation (Step 4)
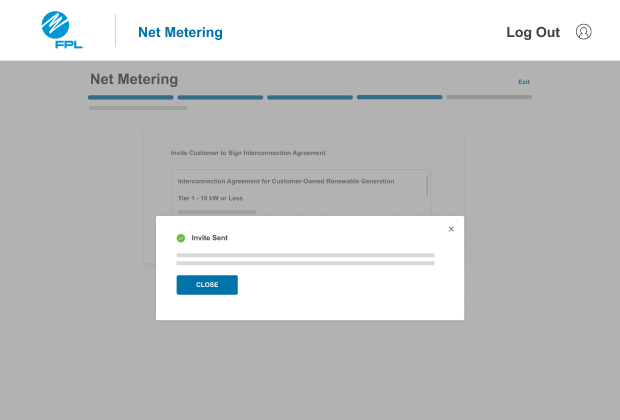
- Invite your customer to sign the Interconnection Agreement electronically by clicking “Invite customer” button.
- You may also upload the computer-generated interconnection agreement including the customer's signature. Do not upload agreements filled in manually. Click “Save & Continue” to “Upload Documents”
- Upload the additional documents required for the tier level and click “Save and Continue” and proceed to “System Cost”.
- Enter the system cost and click “Save and Continue” and proceed to “Review” your application.

4.6 Review and Submit (Step 5)
- Review the application and use “Edit” link associated to each step to go to the particular step and make changes.
- Click “Submit” after reviewing the application.
- A confirmation email will be sent to you and your customer.

Register for a new account by visiting our Net Metering Portal. Add your email, name, phone number and create a unique password. If you already have an account, use your existing credentials.
Enroll your business by entering the business name, license number and address details. A confirmation email will be sent when your company is registered. Now, you will be able to log in at any time and invite customers while we verify your business. To log in, select your region and input your credentials.

One of our representatives will verify your business using the provided license details. Your business verification status will be displayed once you log in:
- Successfully verified: You can log in and edit your applications.
- Pending: Business verification is still in progress.
- Failed: Information is missing; the reason for failure is listed. Update the details and retry your submission.
General tips:
- Monitor the status of the application by logging in to your account; you will only receive email updates after your application has been submitted.
- Get your system size pre-approved before installation by following step three below.
- For application related questions, contact us at netmetering@fpl.com.
Complete the invite customer form and send the application invitation directly from our portal. Once the customer grants you access, you’ll receive an email to log in and begin editing on the applications dashboard.
Customers can begin the application process and grant you access. The customer does not need to wait for the invitation to begin the application process.
Get your system size pre-approved before installation by entering your system and inverter information in the application. Refer to the Electric Service Standards Section XIII for more information.
Depending on your tier level, and if the system is properly sized, it will be pre-approved for 365 days, so it's important to note the expiration date.
If your system is not pre-approved or if you receive a warning message, you must reduce the system size or reach out to us for assistance.
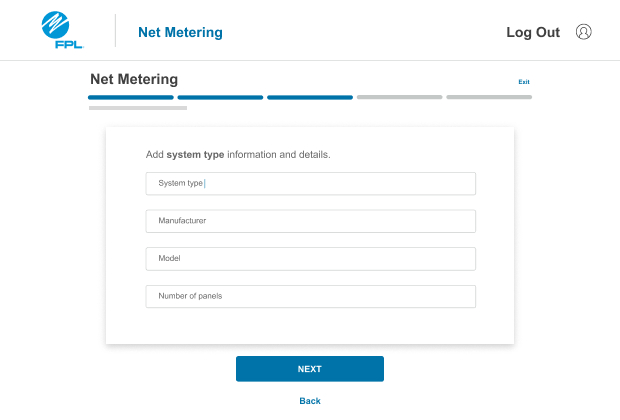
Add new system
To add your system information in the application, start typing your new system’s manufacturer and model name, then select from the suggestions. Fill out the form with the energy type, model and array. Use Add another system/orientation for additional systems. The system size will be checked, and an informational display will show your classification and fee, if applicable. As each new array is added it will appear at the bottom of the page.
Add new inverter
To add your inverter information in the application, start typing the manufacturer and model name, then select from the suggestions. Complete the form with the manufacturer, model and number of inverters. Use Add another inverter if needed. As each new inverter is added it will appear at the bottom of the page.
Log in to the applications dashboard to view all your company's projects. To log in, select your region and input your credentials. Only projects in Northwest Florida can be edited. If you select an application outside of Northwest Florida, you will see an alert at the top of the page to switch regions. You can manually switch regions by logging into the FPL Net Metering Portal to edit applications outside of Northwest Florida.
The search tool helps you find applications by name, address or keyword. Scroll through results and select applications to view status or edit details.
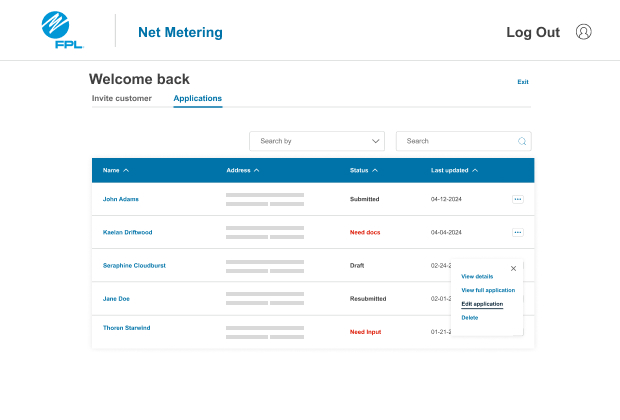
You can take several actions when viewing all of your applications by using the ellipsis to the right of each application or selecting the application name, including:
View details
Your application details will appear when selected, including application number and tier information.
View full application
View your full application details, including customer information, application form and status.
Edit an application
When your application is in draft status, edit if needed using the ellipsis to the right of the application or clicking on the application name. Use the pencil icon to edit the section that needs updates. Only customers can edit customer and contractor information.
If your application status is “Need Input,” select the application name or use the ellipsis to the right of the application, select “View full application.” Use the “Edit” button to address the needed information to process your application.
Delete application
If your application status is “Draft,” you can delete it by using the ellipsis to the right of the application and selecting “Delete.”
Additionally, all applications will display with a status:
- Draft: An application was started but has not been reviewed, submitted or completed.
- Need Input: More information is needed in order to process your application.
- Completed: Your application was approved and your Permission to Operate was issued.
- Inactive: The customer’s FPL account is not connected and the net metering agreement or application is not currently active. If you believe an inactive application was created in error, reach out to the customer to confirm.
- Submitted: Your application was submitted and pending review.
- Resubmitted: Your application was resubmitted after additional information was added. It is pending review.
- On hold: The customer’s FPL account is not currently connected and scheduled to be activated at a future time. Reach out to your customer for updates.
- Meter CGI: There are various reasons why an application would be labeled as cannot get in (CGI). To correct this, contact us at netmetering@fpl.com.
Edit documentation
You may need to invite your customer to sign the Interconnection Agreement electronically using Invite customer button. Once the customer signs the Interconnection Agreement, they will be able to upload all required documents. Additionally, you may upload the required tier-level documents, proceed to System Cost, add the cost, then review the application.
For systems larger than 10 kW AC, an invoice will be sent via email. Submit the application fee by ACH, wire transfer or mailing a check, and include the invoice number. Even if submitted, the application won't be reviewed until payment is received.
Review and submit
Review the application, edit if needed and then submit. A confirmation email will be sent to you and your customer once the application is submitted. You will not receive status update emails before submitting the application.
Additionally, we will not review Tier 1 and Tier 2 applications until they are submitted, and application fees are received, if applicable.
Once your application is approved
Once your application has been reviewed and approved, a Meter Order will be issued to install the bidirectional meter. Once the meter is set, your customer will receive a Permission to Operate email. You will also receive this email if your customer has granted you access to their application.
If your application is denied
If your application is denied, make the necessary updates communicated to you, such as correcting the system size, uploading missing documents, verifying customer information, etc. Then resubmit your application.
Featured Questions
No, however, you may invite your customer to initiate the net metering application and provide you access to it. You can generate an email from FPL's net metering contractor portal to your customer requesting for them to start the application process. Once your customer provides you access, you may complete the application process.
If my customer sells their home with the installed solar system, does the next homeowner or business need to complete an interconnection agreement?
Yes, the new homeowner or business will need to complete a net metering application. Detailed system information won't be needed if there have been no changes to the system.
Yes, only when the customer provides you access to their net metering application. Contractors will receive email notification on the status of the customer's net metering application, including the permission to operate email.
Pre-approval
Payment, Review & Meter Installation
FPL will verify the type of meter currently installed at your customer's location. If they have a bidirectional meter, a new meter will not be required. If they do not have a bidirectional meter, the meter will be exchanged for a meter compatible with the net metering program.